Table of Contents
Docker tutorial
Recommended steps
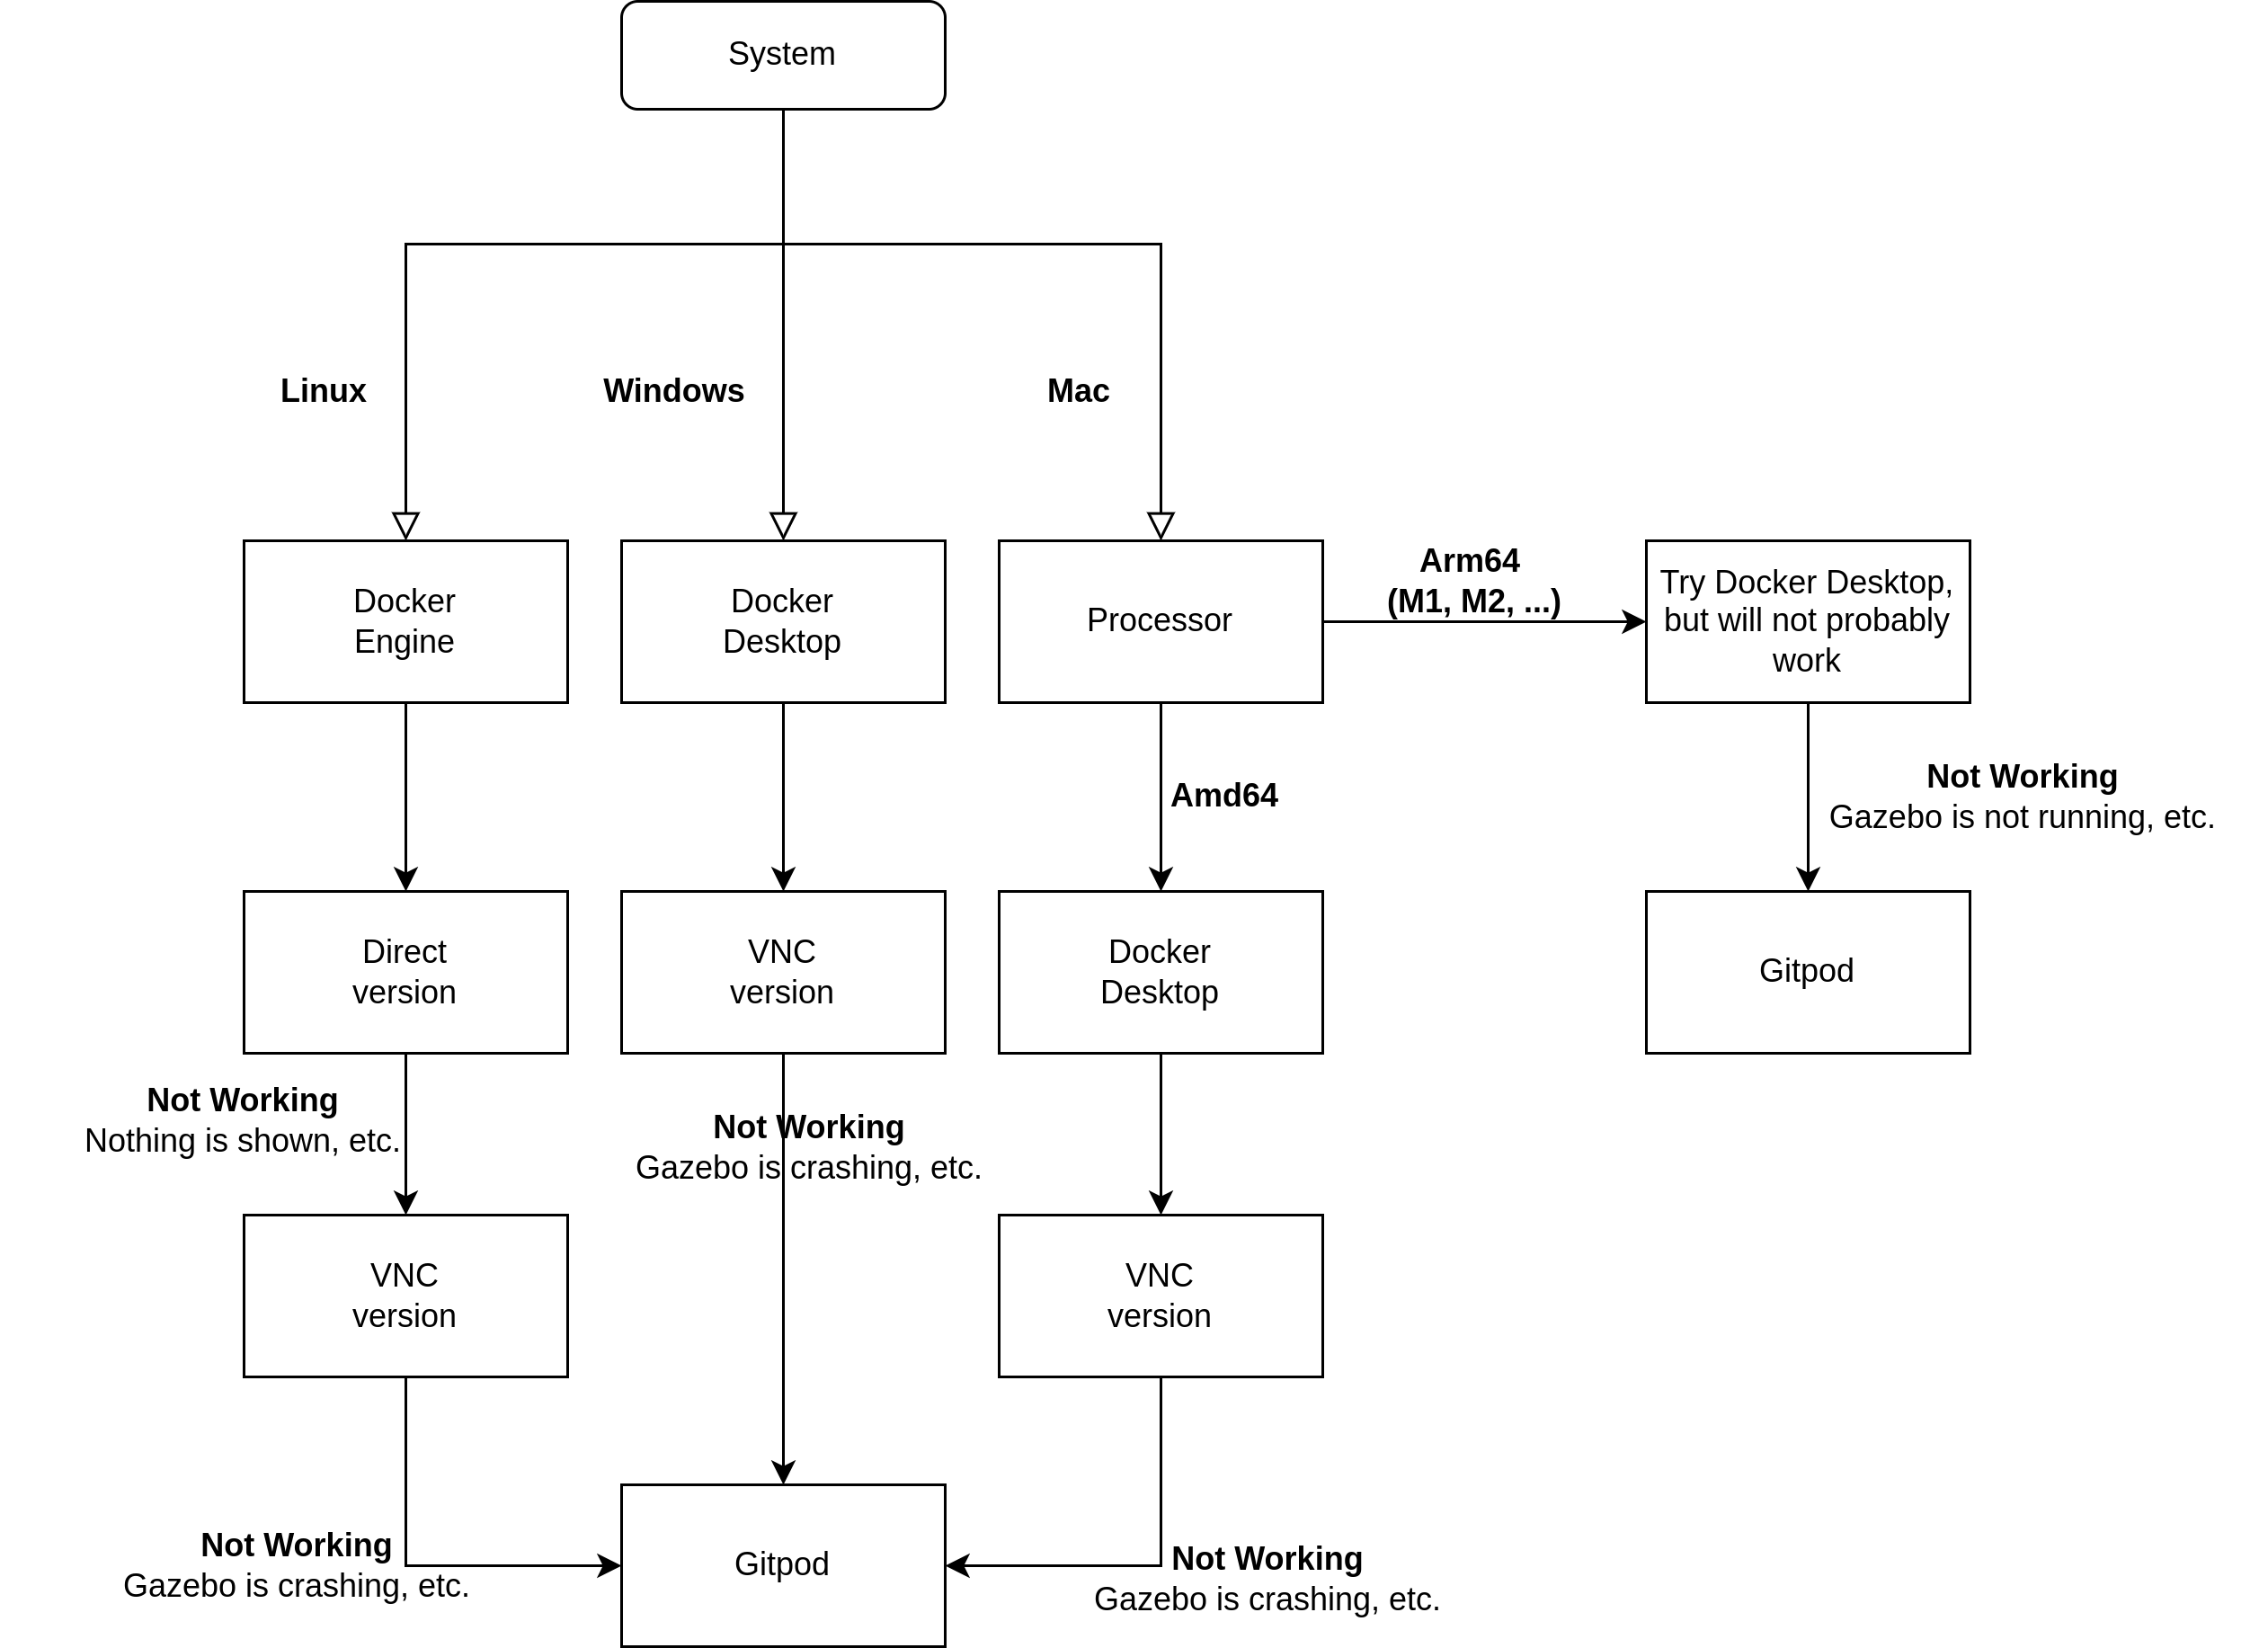
Please, try to follow this instructions based on your system. Linux is recommended, but other may work. Mac computers with arm64 processors (M1, M2) will not probably work. In case of any questions, ask Lukáš Rustler (email, forum, or in some cases Discord).
Docker installation
The official installation guide is available here. For Windows and Mac, binaries are available to be downloaded. For Linux, we recommend to install only docker engine (named 'Server' in the link). You need to choose your distribution and follow the guide for installation from repository (recommended), .deb package, or with a convenience script.
Windows users
Docker now requires WSL2. It should install automatically with Docker, but it may happen that something go wrong. If you run Docker and you still see Docker engine starting, the installation of WSL is probably not correct. In that case, open PowerShell and type wsl -l -v. If nothing happens (the output is empty) then you probably need to update to WSL2. First thing to do is wsl –set-default-version 2 (there is double dash in front of 'set'), then install this patch WSL2 kernel patch and restart docker engine.
Docker commands
Image version:
- VNC only version (Windows, Linux) - the programs will be redirected to VNC, which allows them to run even on Windows. Works on linux as well, and may be better for some users.
- VNC + Direct mode (Linux) - VNC can be used as well, but it is possible to also run programs directly without VNC. However, it may not work on some systems.
Docker commands
Run the image
- Use our script (Linux only)
- VNC version - run.sh
./run.sh link_path container_name image_name
- VNC + Direct version - run_direct.sh
xhost local:root && ./run_direct.sh link_path container_name image_name
link_path- path on your computer, which will be visible in Docker. You can use this path to easily share files to/from Docker.- Default: “”. However, we do recomend to use this
- Example:
- Linux:
./run.sh /home/my_user/data
container_name- name of the container, which can be used to stop, start, …- Default: HRO
image_name- name of the image to be downloaded.- Default: b3m33hro/labs:new
- Do the same by hand
- Download the image
docker pull b3m33hro/labs:new
- Name your image for an easier usage.
<image_name>is an arbitrary name for your image, e.g.,hro_imagedocker tag b3m33hro/labs:new <image_name>
- Run the image.
-itis for interactive mode.-pdetermines which ports will be accessible from the host system.<container_name>is an arbitrary name of your container, e.g.,hro.-vspecifies which folder will be shared between the container and the host system (optional).<image_name>is the name selected in the previous step.- The shared folder is used for easier transfer of files created in the Docker container. You can also share code that way, so you can edit it from both the host machine and from inside the container.
- VNC (Windows, Linux):
docker run -it -p 6080:6080 -p 8888:8888 --name <container_name> -v path_to_data_folder_host_system:/root/data <image_name>
- (Windows) The link path can look like:
-v C:\Users\my_user\data:/root/data
- Direct (only linux):
xhost local:root && docker run -it -e "DISPLAY" -e "QT_X11_NO_MITSHM=1" -e "XAUTHORITY=${XAUTH}" -v ~/.Xauthority:/root/.Xauthority:rw -v "/tmp/.X11-unix:/tmp/.X11-unix:rw" -v /dev:/dev -v /etc/hosts:/etc/hosts --network host --privileged --name <container_path> -v path_on_your_computer_to_shape:/root/data <image_name>
Run the programs
1. VNC (Windows, Linux) - this method runs VNC server and you can see everything in your browser
- From inside the container run command to start the VNC server. The server is needed for OpenGL software.
vnc && start-vnc-session.sh
- On your host machine open any internet browser and type
http://localhost:6080to the address bar. A window with a Linux environment should open.- The VNC server may crash sometimes. To fix it, just run
start-vnc-session.shagain. - Unfortunately, you can not copy-paste from the host machine to the VNC.
- Solution is to copy things from the internet browser directly in the VNC. Another possibility is to use the VNC only as a “screen” and use a terminal on the host machine to control it.
2. Direct (Linux only) - this runs the programs directly
- Run every program as usuall and it will appear directly on your screen
- After you restart your computer and want to use docker again in direct mode, you have to run
xhost local:root
HRI
- Choregraphe can be run from terminal with the command
choregraphe- you can select 90-days test, or enter this key
654e-4564-153c-6518-2f44-7562-206e-4c60-5f47-5f45
Edit→Preferences→Virtual robot—chose Pepper V16 robot. Next time you can run only choregraphe and Pepper will be there.
- RoboDK must be installed first (because of licensing). One can do it from terminal with command
/root/Install-RoboDK. The program can be then run with command/installation_path/RoboDK-Start.sh(whereinstallation_pathis/RoboDKin default), or with Desktop icon.- You will have 30days licence (which should be enough)
Other commands
- To start docker after you close it and to open new terminal, you can use scripts restart_docker and new_docker
- both accepts one argument <container_name> (see above)
- Again, to use direct mode you have to run
xhost local:root before the scripts
- Stop the container (any of the three methods will work)
docker stop <container_name>
CTRL+D
exit
- Restart the container
   docker start <container_name>
   docker attach <container_name>
- Open another terminal in the same container
docker exec -it <container_name> /bin/bash
- Remove a stopped container from your system
docker container rm <container_name>
- Clean up all docker resources
docker system prune -a
Functionality check
- Check GraspIt!. Open the terminal and run
graspit_simulator - Check Jupyter. Open terminal, run
jupyter-notebook. Open a browser (in container or in the host machine) and enterhttp://localhost:8888and you should see Jupyter notebook interface.- Do not run the notebook from Applications-Development menu
- Check Robotology build. Open the terminal and run the following lines. Gazebo interface with iCub robot should appear.
   git clone https://gitlab.fel.cvut.cz/body-schema/teaching/b3m33hro-labs.git
   cd b3m33hro-labs/lab3/tutorial_cartesian-interface/smoke-test
   ./test.sh
Gitpod
In case of problems with Docker on your computer, you can use Docker on Gitpod. Gitpod allows running Docker images on their servers for free (each registered user can use 50 hours per month).
- Open Gitpod
- you will need github.com account
- Image should be automatically downloaded and run in your new Gitpod workspace
/workspace will be saved after you stop and start the workspace again!
- No
docker runand others are needed - Try Functionality check again
- With every new terminal you should be automatically switched to user
root. If not, please runsuwith passwordroot.
Everything should work almost the same as in the local installation, but server resources are used. However, you can not link folder from your PC as in the case of local Docker. You can either use data only in docker, or there are several ways how to share code:
- Always upload and download data from the main page of Gitpod workspace
- the workspace is in location
/workspaceand linked to/root/workspace
- Use Git. You can:
- Run Gitpod from your repository by:
- make a fork of https://github.com/rustlluk/B3M33HRO-gitpod, or
- create a new repository and add .gitpod.yml to it.
- Use other repository to share code, e.g., fork of our lab repository.
- It is better to use public repository. If you use private one, you need to create ssh key:
ssh-keygen -t rsaand press Enter few times, thencat ~/.ssh/id_rsa.pub, copy the output to Github SSH keys settings. And then change the origin of the repo (there is HTTPS access as default and you cannot push with HTTPS anymore) asgit remote set-url origin <your_new_ssh_adress>. The ssh address can be found when you go to your github repository and click on 'Clone' button.
- Mount some folder on public server (e.g., your folder at taylor.felk.cvut.cz) to the Docker environment and your host PC (with sshfs or other). This option may work almost the same as
-voption in local Docker installation.
You can copy/paste things to the Gitpod workspace terminals, but you need to approve it (popup window with the question should appear after you first try to paste something).)
- Check this script, which will link your home folder on taylor.felk.cvut.cz (the same home is linked to the lab computers) to the docker. And you can link the same folder to your computer.
- The only parameter is your username in CTU/FEE systems, e.g.
./mount_data rustlluk- You will be prompted to add a password, which should be you CTU password or check here External Link
- You can call this even on your computer to link the same folder
FAQ
- On Windows, the Docker sometimes allocates too much memory, which may cause Gazebo to fail. Restart the Docker (from status bar) or restart the computer.
- If the provided scripts do not work, try to make them executable with
chmod +x script_name- You can also put them into
/usr/bin/to make run them easier.- E.g.:
sudo ln -s /home/your_user/scripts/restart_docker /usr/bin/restart_dockerwill link the script and then you can run it easily asrestart_dockerfrom any directory
- If you want to install anything inside the Docker,
apt updatewill most probably be needed to be run first. Else you will getno package …error. - If you are using Mint, do not use
$(lsb_release -cs)when adding the repository, but use name of Ubuntu version corresponding to your Ubuntu kernel from Ubuntu versions. - You can also run the smoke-test without GUI, which may be faster on slower computers. Just open
some_path/smoke-test/fixtures/fixture.xmlin the given project you want to test and remove/comment the whole<module>section containinggzclient. - Try to run Gazebo at least twice, it may fail sometimes.
- If your Gazebo fails in the middle of operation try to free as many resources on your computer as possible (RAM, CPU) by, for example, closing other internet browser tabs. Restart Docker, or try to kill other running processes of yarp or Gazebo.
- check whether anything is running in
toporhtopand kill it (look for anything with yarp, gz, iCartesian* etc.). However, usingpkill -f gz,pkill -f yarpandpkill -f tutorialshould be enough in most cases to kill all Gazebo and Yarp related things.
Manual installation
You need to install Robotology superbuild, GraspIt!, gpd, Python 2.7 and 3.X. Optionally, ROS is needed. You can check Dockerfile to get an idea of how everything is installed.